
Preventing and controlling falls
What is a fall protection system?
A fall protection system is designed to prevent falls or control them so that someone who does fall doesn’t die. If workers will
be exposed to fall hazards that you can’t eliminate, you need to protect them with one of the fall protection systems shown in
Table 5.

Other fall protection methods. The following methods may also be appropriate for preventing falls:
• Safety monitoring for roofing work. A method in which a person — rather than a mechanical system — warns roofers when they are in danger of falling. The monitor, who must be a competent person, is responsible for recognizing the hazards and warning workers about them.
• Catch platforms. Though not covered in Subdivision M, catch platforms, which consist of a stable platform and an attached standard guardrail, can protect workers when other systems or methods are not feasible.
• Covers for holes. Simple and effective when they are capable of supporting, without failure, at least twice the weight of
employees, equipment, materials that may be imposed on the cover at one time, and are properly installed. Rigid covers prevent workers from falling through temporary holes, openings, and skylights in walking/working surfaces.
• Fences and barricades. Use a fence or similar barricade to keep people away from wells, pits, and shafts.
Back to Top
What to consider when selecting a fall protection system
Appropriate fall-protection systems have the following characteristics:
• They’re affordable.
• They offer the least interference with workers’ tasks or activities.
• They prevent falls or protect workers who do fall.
Wherever possible, eliminate fall hazards. Identify hazards that you can’t eliminate and evaluate each one. The evaluation will help you determine appropriate fall protection systems for your work site. Consider the following:
• What is the fall distance from the walking/working surface to the next lower level?
• How many workers are exposed to the hazard?
• What tasks and work areas are associated with the hazard?
• How will the workers move — horizontally, vertically, or in both directions — to do their tasks?
• Are secure anchorages available or can they be easily installed near the hazard?
• Are there other hazards near the work area, such as overhead power lines?
• How will workers be promptly rescued if they are suspended in a personal fall-arrest system?
Back to Top
Personal fall-arrest system
A personal fall-arrest system consists of an anchorage, connectors, and a full-body harness that work together to stop a fall and to minimize the arrest force. Other parts of the system may include a lanyard, a deceleration device, and a lifeline. The
personal fall-arrest system is effective only if you know how all of the components work together to stop a fall. Before you use
a personal fall-arrest system, you should know the following:
• How to select and install a secure anchorage
• How to select and use connectors
• How to put on and use a full-body harness
• How to correctly attach and use a lanyard
• When a deceleration device is necessary
• How to erect and use a lifeline
• The correct procedures for using retractable devices
• How to estimate fall distances
• How to avoid swing falls
• How to inspect and maintain the system
• How you will be promptly rescued if you fall

The anchorage. An anchorage is a secure point of attachment for lifelines, lanyards, or deceleration devices. An anchorage
for a personal fall-arrest system must support at least 5,000 pounds. Anchorages that can’t support 5,000 pounds must be
designed and installed under the supervision of a qualified person and must be able to maintain a safety factor of at least two— twice the impact force of a worker free-falling six feet. If you don’t know how much weight an anchorage will support, have a qualified person check it before you trust your life to it.
-
Anchorage strength is critical, but is not the only factor to consider. Also important:
-
Anchorage connector. Unless an existing anchorage has been designed to accept a lanyard or lifeline, you need to
attach an anchorage connector — a device that provides a secure attachment point. Examples include tie-off adapters, hook anchors, beam connectors, and beam trolleys. Be sure that the connector is compatible with the lanyard or lifeline and appropriate for the work task.
-
Attachment point. The anchorage can be used only as the attachment point for a personal fall-arrest system; it can’t be used to support or suspend platforms.
-
Location. The anchorage should be located directly above the worker, if possible, to reduce the chance of a swing fall.
-
Fall distance. Because a personal fall-arrest system doesn’t prevent a fall, the anchorage must be high enough above a worker so that the arrest system, rather than a lower level, stops the fall. Consider free-fall distance, lanyard length, shock-absorber elongation, and body-harness stretch in determining the height of an anchorage.
-
Free-fall distance is the distance a worker falls before a personal fall-arrest system begins to stop the fall.
Connectors. An anchorage, a lanyard, and a body harness are not useful until they are linked together. Connectors do the linking; they make the anchorage, the lanyard, and the harness a complete system. Connectors include carabiners, snap hooks, and D-rings.
-
Carabiner. This high-tensile alloy steel connector has a locking gate and is used mostly in specialized work such as window cleaning and high-angle rescue. Carabiners must have a minimum tensile strength of 5,000 pounds.
-
Snap hook. A hook-shaped member with a keeper that opens to receive a connecting component and automatically closes when released. Snap hooks are typically spliced or sewn into lanyards and self-retracting lifelines. Snap hooks must be high-tensile alloy steel and have a minimum tensile strength of 5,000 pounds.
-
Use only locking snap hooks with personal fall-arrest systems; locking snap hooks have self-locking keepers that won’t open until they are unlocked.
-
D-ring. D-rings are the attachment points sewn into a full-body harness. D-rings must have a minimum tensile strength of 5,000 pounds.
-
The full-body harness. The full-body harness has straps that distribute the impact of a fall over the thighs, waist, chest, shoulders, and pelvis. Full-body harnesses come in different styles, many of which are light and comfortable. Before you purchase harnesses, make sure that they fit those who will use them, they’re comfortable, and they are easy to adjust.
-
A full-body harness should include a back D-ring for attaching lifelines or lanyards and a back pad for support.
-
Never use a body belt as part of a personal fall-arrest system.

Lanyards. A lanyard is a specially designed flexible line that has a snap hook at each end. One snap hook connects to the
body harness and the other connects to an anchorage or a lifeline. Lanyards must have a minimum breaking strength of 5,000 pounds. They come in a variety of styles, including self-retracting types that make moving easier and shock-absorbing types that reduce fall-arrest forces.
-
Don’t combine lanyards to increase length or knot them to make them shorter.

Deceleration devices protect workers from the impact of a fall and include shock-absorbing lanyards, self-retracting lifelines or lanyards, and rope grabs.
-
Shock-absorbing lanyard. A shock absorber reduces the impact on a worker during fall arrest by extending up to 3.5 feet to absorb the arrest force. Subdivision M rules limit the arrest force to 1,800 pounds but a shock-absorbing lanyard can reduce the force even more — to about 900 pounds.
A shock absorber reduces the impact on a worker
during fall arrest by extending up to 3.5 feet to absorb the arrest force. Subdivision M rules limit the arrest force to 1,800 pounds but a shock-absorbing
lanyard can reduce the force even more — to about 900 pounds.
Because a shock-absorbing lanyard extends up to 3.5 feet, it is critical that the lanyard stops the worker before the next lower level. Allow about 20 vertical feet between the worker’s anchorage point and the level below the working surface.
Always calculate the total distance of a possible fall before using a shock-absorbing lanyard.
Consider the following example:
-
How to calculate total fall distance: Lanyard length (6 feet) + deceleration distance (3.5 feet) + worker’s height (6 feet) + safety margin (2 feet) = 17.5 vertical feet from anchorage to lower level.
-
Never use a shock-absorbing lanyard if the shock absorber is even partially extended or if the
lanyard has arrested a fall.
-
Self-retracting lanyards and lifelines that limit free-fall distance to two feet or less must be able to
hold at least 3,000 pounds with the lanyard (or lifeline) fully extended.
Self-retracting lanyards that don’t limit free-fall distance to two feet must be able to hold at least
5,000 pounds with the lanyard (or lifeline) fully extended.
-
Beware of swing falls! If you use a self-retracting lanyard or lifeline, work below the anchorage to avoid a swing fall. The farther you move away from the anchorage, the farther you will fall and the greater your risk of swinging back into a hard object.
Swing falls are hazardous because you can hit an object or a lower level during the pendulum motion.

Rope grab. A rope grab allows a worker to move up a vertical lifeline but automatically engages and locks on the lifeline if the worker falls. When using a rope grab, keep the following in mind:.
-
The rope grab must be compatible with the lifeline.
-
The rope grab must be correctly attached to the lifeline (not upside down).
-
Keep the lanyard (between the rope grab and the body harness) as short as possible.
-
Keep the rope grab as high as possible on the lifeline.
Lifeline. A lifeline is a cable or rope that connects to a body harness, lanyard, or deceleration device, and at least one
anchorage. There are two types of lifelines, vertical and horizontal.
Vertical lifeline. A vertical lifeline is attached to an overhead anchorage and must be connected directly to a worker’s full-body harness, lanyard, retractable device, or rope grab; it must have a minimum breaking strength of 5,000 pounds.
When a worker needs to move horizontally, however, a vertical lifeline can be hazardous due to the potential for a swing fall — the pendulum motion that results when the worker swings back
under the anchor point. A swing fall increases a worker’s risk of striking an object or a lower level during the pendulum motion.

Horizontal lifeline. Unlike a vertical lifeline, the horizontal lifeline stretches between two anchorages. When you connect a lanyard or rope grab to a horizontal lifeline, you can move
about freely, thus reducing the risk of a swing fall. However, horizontal lifelines are subject to much greater loads than vertical lifelines. Horizontal lifelines can fail at the anchorage points if they’re not installed correctly. For this reason, horizontal lifelines must be designed, installed, and used under the supervision of a qualified person.
Horizontal lifelines and sag angles. Any load on a horizontal lifeline will cause it to deflect or sag. The sag angle is a horizontal lifeline’s angle of deflection when it is subjected to a load, such as a falling worker. Reducing the sag angle (making a horizontal lifeline too tight) actually increases the force on the line during a fall. As you tighten a horizontal lifeline, you dramatically increase the impact load! For example, when the sag angle is 15 degrees, the force on the lifeline and anchorages subjected to a load is about 2:1. However, if you decrease the
sag angle to five degrees, the force increases to about 6:1.
-
To reduce loads on a horizontal lifeline, increase the sag angle or connect to the lifeline with a shock-absorbing lanyard.
Safe practices for personal fall-arrest systems
• Don’t tie knots in rope lanyards and lifelines; knots can reduce strength by 50 percent.
• Don’t tie lifelines or lanyards directly to I-beams; the cutting action of beam edges can reduce the rope’s strength
by 70 percent.
• Know how the sag angle of a horizontal lifeline affects arrest forces on the anchorages.
• Remember, horizontal lifelines must be designed, installed, and used under the supervision of a qualified person.
• Think about the potential for a swing fall whenever you connect a lifeline to a personal fall-arrest system.
• Remember, a shock-absorbing lanyard will elongate before arresting a fall. The fall distance includes lanyard length
(before the shock absorber extends), deceleration distance (shock-absorber extension), worker height, and a safety
margin (allow two feet).
Back to Top
Personal fall-restraint systems
Unlike the personal fall-arrest system, which is designed to stop a fall, a personal fall-restraint system prevents a worker from reaching an unprotected edge and thus prevents a fall from occurring. The system consists of an anchorage, connectors, and a body harness or a body belt. The attachment point to the body belt or full-body harness can be at the back, front, or side D-rings.
The anchorage for a fall-restraint system must support at least 3,000 pounds or be designed and installed by a qualified person and have a safety factor of at least two.
Back to Top

Positioning device systems
Positioning-device systems make it easier to work with both hands free on a vertical surface such as a wall or concrete form. Positioning-device systems are also called Class II work-positioning systems and work-positioning systems.
The components of a positioning-device system — anchorage, connectors, and body support — are similar to those of a personal fall-arrest system. However, the systems serve different purposes. A positioning-device system provides support and must stop a free fall within two feet; a personal-fall-arrest system provides no support and must limit free-fall distance to six feet.
Anchorage. Positioning-device systems must be secured to an anchorage that can support at least twice the potential impact of a worker’s fall or 3,000 pounds, whichever is greater.
Connectors. Connectors must have a minimum strength of 5,000 pounds. Snap hooks and D-rings must be proof-tested to a minimum load of 3,600 pounds without deforming or breaking.
Body support. A body belt is acceptable as part of a positioning-device system. However, it must limit the arresting force on a worker to 900 pounds and it can only be used for body support. A full-body harness is also acceptable but must limit the arrest force to 1,800 pounds. Belts or harnesses must have side D-rings or a single front D-ring for positioning.
Back to Top

Guardrail systems
A guardrail system consists of a top rail, midrail, and intermediate vertical member. Guardrail systems can also be combined with toeboards that prevent materials from rolling off the walking/working surface.
Guardrail systems must be free of anything that might cut a worker or snag a worker’s clothing. Top rails and midrails must be at least 1/4-inch thick to reduce the risk of hand lacerations; steel and plastic banding cannot be used for top rails and midrails. Other requirements for guardrails:
-
Wire rope used for a top rail must be marked at least every six feet with high-visibility material.
-
The top rail of a guardrail must be 42 inches (plus or minus three inches) above the walking/working surface. The top edge height can exceed 45 inches if the system meets all other performance criteria.
-
Midrails must be installed midway between the top rail and the walking/working surface unless there is an existing wall or parapet at least 21 inches high.
-
Screens and mesh are required when material could fall between the top rail and midrail or between the midrail and the walking/working surface.
-
Intermediate vertical members, when used instead of midrails between posts, must be no more than 19 inches apart.
-
A guardrail system must be capable of withstanding a 200-pound force applied within two inches of its top edge in any outward or downward direction.
-
Midrails, screens, and intermediate structural members must withstand at least 150 pounds of force applied in any downward or outward direction.
Wall openings
Each employee working on, at, above, or near wall
openings (including those with chutes attached)
where the inside bottom edge of the wall opening
is less than 39 inches above the walking/working
surface and the outside bottom edge of the wall
opening is six feet or more above lower levels,
must be protected from falling by the use of guardrail
systems, safety net systems, personal fall arrest
systems, or personal fall restraint systems.
A simple method to protect employees from falling
through such wall openings is to use available framing
material as a guardrail that is capable of withstanding,
without failure, a force of at least 200 pounds in any
outward or downward direction, at any point along the
top edge. The top edge height of the top rail must
be 42 inches (plus or minus three inches) to the
walking/working surface. If the bottom edge of the
wall opening is less than 21 inches from the walking/
working surface, a midrail must also be installed.
An opening means a gap or void 30 inches or more
high and 18 inches or more wide, in a wall or partition,
through which employees can fall to a lower level.
Back to Top

Safety net systems
Safety-net systems consist of mesh nets and connecting components.
-
Safety-net openings can’t be more than six inches on a side, center to center.
-
Safety nets must not be installed more than 30 feet below the working surface.
-
An installed net must be able to withstand a drop test consisting of a 400-pound sandbag, 30 inches in diameter, dropped from the working surface.
-
Inspect safety nets regularly and remove debris from them no later than the start of the next work shift.
The minimum horizontal distance to the net’s outer edge depends on how far below the working surface the net is placed, as shown in Table 6.


Warning line systems for roof work
Roofing work refers to hoisting, storing, applying, and removing roofing materials and equipment. Roofing work includes work on related insulation, sheet metal, and vapor barriers, but does not include construction of the roof deck or leading-edge work.
A warning-line system for roofing work consists of ropes, wires, or chains, and supporting stanchions that mark off the area where roofing work can be done without guardrails, personal fall-arrest systems, restraint systems, or safety nets. Warning-line systems can only be used for roofing work on roofs that have slopes of 2:12 or less, vertical to horizontal. The purpose of the line is to warn roofers that they are near an unprotected edge.
The warning line must be at least six feet from an unprotected edge and meet the following criteria:
-
Be flagged at least every six feet with high-visibility material.
-
Be rigged so that the line is 34 to 39 inches from the walking/working surface.
-
Have a minimum tensile strength of 500 pounds. Don’t use plastic caution tape for a warning line.
-
Be attached to each stanchion so that tension on one section of the line will not cause an adjacent stanchion to tip over. Stanchions must be able to support a force of at least 16 pounds applied horizontally in the direction of the roof edge without tipping over.
Those who do roofing work between the warning line and an unprotected roof edge must be protected with personal fall-arrest systems, restraint systems, guardrail systems, safety monitoring systems, or safety nets.
Back to Top

Warning line systems for non-roofing construction
Construction trades that don’t do roofing work can use warning lines similar to those allowed for roofing work; however, non-roofing work warning lines only alert workers who are approaching an area where unprotected fall hazards exist and are not considered a fall protection systems.
Setting up. Non-roofing work warning lines also differ from warning lines used by roofers by where they are set up. The setback distance for non-roofing warning lines must be far enough back to prevent worker exposure to fall hazards. When determining the appropriate setback distance, factors such as, but not limited to, weather, visibility, the slope and condition of the work surface, the work performed, materials handled, workers’ experience, and supervision must be considered. While the minimum setback distance for non-roofing warning lines is 10 feet, when these factors are taken into consideration, or if work site conditions change, the 10-foot setback distance may need to be increased.

Safe practices
-
The work surface should be relatively flat with a slope of 2:12 or less.
-
The warning line should be 34 to 39 inches above the work
surface.
-
The warning line should be rope, wire, or a chain. Avoid using plastic tape for a warning line; workers should be able to feel the line if they back up against it, even if they’re wearing heavy clothing.
-
The warning line should be flagged at least every six feet with high-visibility material and have warning signs that are
visible to workers.
-
Stanchions that support the warning line should be able to withstand a force of at least 16 pounds, applied horizontally
in the direction of the unprotected edge, without tipping over.
-
No workers can enter the area between the warning line and the unprotected edge unless they are protected by a fall protection system described in Subdivision M, 1926.502, Fall protection systems, criteria, and practices.
-
Never use a warning line as a substitute for a guardrail.
Back to Top
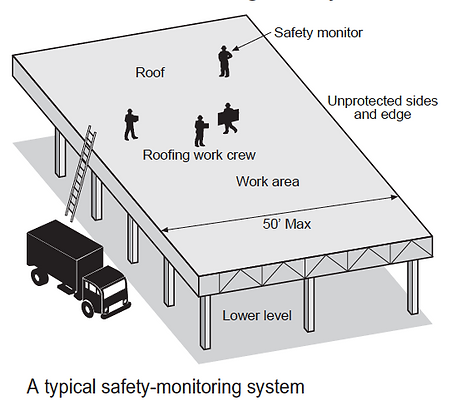
Safety monitoring for roofing work
This system uses a person (safety monitor), rather than a mechanical system to warn roofers when they are in danger of falling. The safety monitor, who must be a competent person, is responsible for recognizing fall hazards and warning workers about them.
Safety monitoring can be used only to protect those who do roofing work on roofs that have slopes no greater than 2:12 and widths no greater than 50 feet. Safety monitoring on roofs wider than 50 feet is not permitted unless a warning-line system also protects the workers.
The safety monitor’s responsibilities include:
• Recognizing fall hazards
• Warning workers when they are unaware of hazards or aren’t working safely
• Staying on the same walking/working surface as the workers to watch them and to communicate with them while they are working
• Avoiding any other work or distracting activity while monitoring the workers
Only those who are doing roofing work are permitted in the area controlled by the safety monitor. Mechanical equipment can’t be used or stored in the area.
Catch platform
A catch platform is a stable platform with attached standard guardrails that can “catch” a falling worker or materials. You can use a catch platform to prevent workers from falling when other
systems or methods are not feasible. Because a catch platform is a scaffold – and covered by Subdivision L (Scaffolds) requirements – it must be able to support its own weight and at least four times the maximum intended load applied or transmitted to it. The maximum intended load includes workers and materials, and the impact force of the fall.
-
For more information about scaffolds, see Part four – Supported access
Covers for holes
Simple and effective when they’re properly installed, rigid covers prevent workers from falling through skylights or temporary openings and holes in walking/working surfaces. Covers must:
• Support at least twice the maximum expected weight of workers, equipment, and materials. Skylights are not considered covers unless they meet this strength requirement.
• Be secured so they won’t be displaced accidentally
• Have full-edge bearing on all four sides
• Be painted with a distinctive color or marked with the word HOLE or COVER
Fences and barricades
Fences and barricades are warning barriers, usually made from posts and wire or boards that keep people away from hazards such as wells, pits, and shafts.
Protecting workers from falling objects
Be aware of those working above or below you. Protect yourself and others from falling objects with one of the following methods:
• Canopies. Make sure canopies won’t collapse or tear from an object’s impact.
• Toeboards. Toeboards must be least 31/2 inches high and strong enough to withstand a force of at least 50 pounds applied downward or outward.
• Panels and screens. If you need to pile material higher than the top edge of a toeboard, install panels or screens to keep the material from dropping over the edge.
• Barricades and fences. Use them to keep people away from areas where falling objects could hit them.
-
When doing overhand bricklaying, keep materials and equipment (except masonry and mortar) at least four feet from the working edge.
-
When doing roofing work, keep materials and equipment at least six feet from the roof edge unless there are guardrails along the edge. All piled, grouped, or stacked material near the roof edge must be stable and self-supporting.
When hardhats are required. Workers must wear hardhats when their jobs expose them to falling objects. In addition, employers must do one of the following to reduce employees’ exposure to objects that could fall from upper levels:
• Erect toeboards, screens, or guardrail systems on upper levels to prevent objects from falling.
• Build a canopy over workers to prevent falling objects from striking them.
• Erect a barricade that prevents workers from entering an area where they could be exposed to falling objects.
